Create Toolbar Extension
While working on a project that was suppose to be delivered on both mobile and PC meant that I had to test out the systems I was working on once with touch controls and then mouse and keyboard. I found it really frustrating to go to project settings and toggle the Always Show Touch Interface and Use Mouse For Touch to simulate touch controls, due to such a short deadline we had to test out the features ourselves with no extra support from Dev Ops or Quality Assurance.
Every little thing counts and when we can automate something even if it is as small as toggling a few checkboxes it sure can save a great deal of frustration and not to mention you are also saved from human error to accidently left an option unchecked and later forgot about it.
This is when I got the idea to just extend the unreal engine’s tool bar and create a small drop down to switch between different control schemes and something as simple as this would make a great piece about getting started with Extending the Unreal Editor.
What We Will Be Making?

We are adding our own drop down menu with an icon and 2 entries to switch between the different control schemes, above picture shows how the final product will look by the end of this article.
Setup:
Since this is an Unreal Editor extension we will start by creating an Editor Module in which our code will reside.
We will call our module MyProjectEditor all I did was to add a new folder in source folder and named postfixed the name with “Editor”.
Inside this folder we will create two more folders just for the sake of consistently, we will call them private and public, just like your default game module the public folder will contain the header files and the private folder will contain CPP files.
MyProjectEditor/Private
MyProjectEditor/Public
Right next to these folder create a new C-Sharp file called: MyProjectEditor.Build.cs
Contents of Build.CS File:
Open up your Build.cs file and let’s copy paste some code.
using UnrealBuildTool;

public class MyProjectEditor: ModuleRules
{
    public MyProjectEditor(ReadOnlyTargetRules Target) : base(Target)
    {
        PrivateDependencyModuleNames.AddRange(new string[]
        {
                   "Core",
                   "CoreUObject",
                   "Engine",
                   "Slate",
                   "SlateCore",
                   "UnrealEd",
                   "ToolMenus"
        });
    }
}
Few things to note here, in our private dependency array we have UnrealEd and ToolMenus added, we will be needing those to access some stuff related to unreal Editor and Tools in the next section, in case you missed some dependency that will throw an error during the linking process.
These errors are kind of hard to understand but the main give away sign is an error like this:
error LNK2019: unresolved external symbol
If you get something like this, you are probably missing some module not mentioned in your dependency list.
Implementing Module:
Now it’s time to implement the module, for this we need to add 2 files one in private and one in public folder, the names of these files will be same as our module name. The class we are going to make will implement the IModuleInterface.
MyProjectEditor.h File Implementation:
#pragma once

#include "Modules/ModuleInterface.h"
#include "Modules/ModuleManager.h"

class FMyProjectEditor: public IModuleInterface
{
public:
	void InitControlScheme(); // Our custom driver function
	virtual void StartupModule() override;
	virtual void ShutdownModule() override;

private:
// Delegate to respond to event.
FDelegateHandle ToolsMenuDelegateHandle;
};
In the Source file:
#include "MyProjectEditor.h"
#include "UnrealEdGlobals.h"
#include "Editor/UnrealEdEngine.h"
#include "ToolMenus.h"
#include "ToolMenu.h"
#include "Framework/MultiBox/MultiBoxBuilder.h"
#include "GameFramework/InputSettings.h"
#include "Engine/GameViewportClient.h"

#define LOCTEXT_NAMESPACE "MyProjectEditor"

IMPLEMENT_GAME_MODULE(FMyProjectEditor, MyProjectEditor);

void FMyProjectEditor::StartupModule()
{
	// You can add your console log here to see if it is working or not.
}

void FMyProjectEditor::ShutdownModule()
{

}
That is all you need to create your own Editor module, now you can navigate back to your project folder and editor your .uproject file, in my case that would be MyProject.uproject
"FileVersion": 3,
	"EngineAssociation": "5.4",
	"Category": "",
	"Description": "",
	"Modules": [
		{
			"Name": "MyProject",
			"Type": "Runtime",
			"LoadingPhase": "Default"
		}
	]
Open the .uproject and add your module right after the main game module which is created by default by unreal.
{
"Name": "MyProjectEditor",
"Type": "Editor",
"LoadingPhase": "Default",
"AdditionalDependencies": [
"CoreUObject"
]
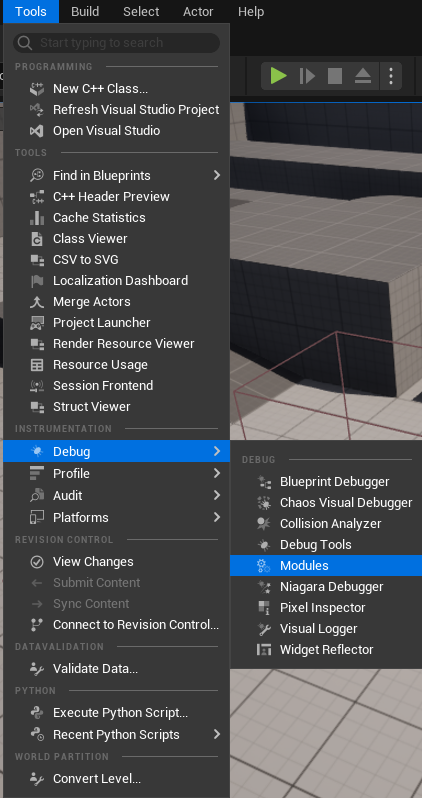
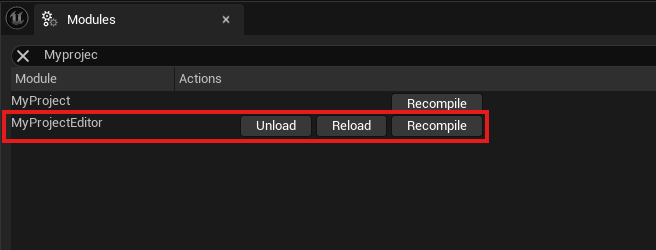
}You can also just launch your project and check the module from Tools → Debug → Modules tab
Setting Up Callbacks and Initialize Function:
Let’s move on to filling up the functions:
void FMyProjectEditor::StartupModule()
{
	if (FSlateApplication::IsInitialized())
	{
		InitControlScheme();

		ToolsMenuDelegateHandle = UToolMenus::RegisterStartupCallback(FSimpleMulticastDelegate::FDelegate::CreateStatic(&RegisterControlSchemeOption));
	}
}

void FMyProjectEditor::ShutdownModule()
{
	// ...
}
In the above module startup function all we are doing is checking if the Slate application is initialized and if true we call our custom driver function(Empty at this point) and we register a static function and store it’s handle in the ToolsMenuDelegateHandle.
So let’s create those static functions:
static void RegisterControlSchemeOption()
{
	UToolMenu* ToolMenu = UToolMenus::Get()->ExtendMenu("LevelEditor.LevelEditorToolBar.PlayToolBar");
	FToolMenuSection& Section = ToolMenu->AddSection("ControlSchemeSection", TAttribute<FText>(), FToolMenuInsert("Play", EToolMenuInsertType::After));

	FToolMenuEntry ControlSchemeEntry = FToolMenuEntry::InitComboButton(
		"ControlSchemeOptions",
		FUIAction(),
		FOnGetContent::CreateStatic(&GetControlSchemeDropdown),
		LOCTEXT("ControlScheme_Label", "Control Scheme"),
		LOCTEXT("ControlScheme_ToolTip", "Select control scheme."),
		FSlateIcon(FAppStyle::GetAppStyleSetName(), "PlayWorld.PossessPlayer") // Find more in build icons in "SlateEditorStyle"
	);

	ControlSchemeEntry.StyleNameOverride = "CalloutToolbar";
	Section.AddEntry(ControlSchemeEntry);
}- The function starts by extending the
PlayToolBarin the Level Editor Toolbar.
UToolMenus::Get()provides access to the tool menu system.
ExtendMenuensures that this function doesn't overwrite the existing toolbar but adds to it.
Adding section to the menu:
- A new section named
"ControlSchemeSection"is added to the menu.
FToolMenuInsert("Play", EToolMenuInsertType::After)specifies that this section will appear after the "Play" section.
Create the dropdown button:
- A dropdown button (
FToolMenuEntry) named"ControlSchemeOptions"is created usingInitComboButton.
Let’s go over the parameters of this function one by one:
"ControlSchemeOptions": The unique name of the button.
FUIAction(): No specific action is bound to the button itself.
FOnGetContent::CreateStatic(&GetControlSchemeDropdown): A static functionGetControlSchemeDropdownis used to provide the content (e.g., options) when the dropdown is opened.
LOCTEXT("ControlScheme_Label", "Control Scheme"): The text label for the button, "Control Scheme."
LOCTEXT("ControlScheme_ToolTip", "Select control scheme."): Tooltip text, "Select control scheme."
FSlateIcon(...): The icon to display on the button, defined by"PlayWorld.PossessPlayer". More icons can be found in Unreal Engine's Slate Editor Style.
Set custom Style:
Overrides the default style of the button, setting it to "CalloutToolbar". This changes how the button looks in the toolbar.
Add button to the section:
Finally, the button is added to the "ControlSchemeSection" that was created earlier.
Get Control Scheme Dropdown:
You might have noticed that we provided another static function in the Control Scheme Entry in the following piece of code:
FOnGetContent::CreateStatic(&GetControlSchemeDropdown),Time to make this one as well, this function will return a shared reference of SWidget type.
static TSharedRef<SWidget> GetControlSchemeDropdown()
{
	FMenuBuilder MenuBuilder{ true, nullptr };

		// Adding a radio button for touch option.
		MenuBuilder.AddMenuEntry(
			FText::FromString("Touch"),
			FText::FromString("Enable touch controls."),
			FSlateIcon(),
			FUIAction(
				FExecuteAction::CreateLambda([]() {SetControlScheme("Touch"); }),
				FCanExecuteAction(),
				FIsActionChecked::CreateLambda([]() -> bool { return IsControlSchemeSelected("Touch"); })
			),
			NAME_None,
			EUserInterfaceActionType::RadioButton
		);

	// Adding a radio button for mouse and keyboard option.
	MenuBuilder.AddMenuEntry(
		FText::FromString("Mouse And Keyboard"),
		FText::FromString("Enable mouse and keyboard controls."),
		FSlateIcon(),
		FUIAction(
			FExecuteAction::CreateLambda([]() {SetControlScheme("MouseKeyboard"); }),
			FCanExecuteAction(),
			FIsActionChecked::CreateLambda([]() -> bool { return IsControlSchemeSelected("MouseKeyboard"); })
		),
		NAME_None,
		EUserInterfaceActionType::RadioButton
	);
	return MenuBuilder.MakeWidget();
}
This might look overwhelming but all we are doing here is adding menu entries for our buttons, first one is for touch and second one is for mouse and keyboard.
The addition here are 2 new functions which we are executing when we click on our radio buttons.
// Static variable inside our MyProjectEditor.cpp file
static FString SelectedControlScheme; //  Switch between "Touch" and "MouseKeyboard"

static bool IsControlSchemeSelected(const FString& ControlScheme)
{
	return SelectedControlScheme == ControlScheme;
}

static void SetControlScheme(const FString& ControlScheme)
{
	SelectedControlScheme = ControlScheme;
}
This is it for now, compile and check your project you will be able to select your own button from the menu.
Saving and Loading Settings:
At this point our buttons are not doing anything so let’s make them save stuff and change our input settings.
First let’s implement the InitControlScheme function:
void FMyProjectEditor::InitControlScheme()
{
	if (UInputSettings* InputSettings = UInputSettings::GetInputSettings())
	{
		// Check if our project is set to show touch interface
		if (InputSettings->bAlwaysShowTouchInterface == true)
		{
			SelectedControlScheme = "Touch";
		}
		else
		{
			SelectedControlScheme = "MouseKeyboard";
		}
	}
}
We get the current control scheme from input settings and assign our static variable SelectedControlScheme to the correct control scheme.
Next let’s move on to SetControlScheme function:
static void SetControlScheme(const FString& ControlScheme)
{
	SelectedControlScheme = ControlScheme;

	// Once you set a control scheme you need to change your input settings
	UInputSettings* InputSettings = UInputSettings::GetInputSettings();
	if (!InputSettings)
	{
		return;
	}

	if (ControlScheme == "Touch")
	{
		GLog->Log("Selected touch as input control scheme.");
		InputSettings->bAlwaysShowTouchInterface = true;
		InputSettings->bUseMouseForTouch = true;
	}
	else
	{
		GLog->Log("Selected keyboard as input control scheme.");
		InputSettings->bAlwaysShowTouchInterface = false;
		InputSettings->bUseMouseForTouch = false;
	}

	// Save the settings both for runtime and default input for persistence.
	InputSettings->SaveKeyMappings();
	InputSettings->SaveConfig();
	GConfig->SetBool(TEXT("/Script/Engine.InputSettings"), TEXT("bAlwaysShowTouchInterface"), InputSettings->bAlwaysShowTouchInterface, FPaths::ProjectConfigDir() + "DefaultInput.ini");
	GConfig->SetBool(TEXT("/Script/Engine.InputSettings"), TEXT("bUseMouseForTouch"), InputSettings->bUseMouseForTouch, FPaths::ProjectConfigDir() + "DefaultInput.ini");
	GConfig->Flush(false, FPaths::ProjectConfigDir() + "DefaultInput.ini");
}
For the sake of simplicity we will be modifying the DefaultInput.ini directly, normally I would recommend that you should store all our your editor tool related configurations in some Editor.ini most preferably in the Saved folder so your settings are per user not global defaults.
let’s break down what is happening in our SetControlScheme function:
- We assign our new control scheme to our static variable
SelectedControlScheme = ControlScheme;
- We Get the input settings and depending on our Control scheme selected we change the values of
bAlwaysShowTouchInterfaceandbUseMouseForTouch.
- The two variables we just changed are responsible for displaying the joystick\gamepad control widgets on our screen and to simulate the touch input using mouse clicks.
- After we are done assigning we simply save the input settings and configs.
- To make this persistence in different sessions, we modify our
DefaultInput.inito reflect the changes and after we are done we simply use the Flush function to force save the changes.
That is all for now.